Troubleshooting
When Error Occurs
When Error occurs
- Check the error number on the controller LED display.
- [When error occurs]
- The last four errors are displayed in 2- digit hexadecimal number.
- The latest error is shown on the leftmost side and the error history is shown in order.
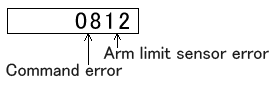
- [Example of display]
- Remove the cause of the error (Refer to the below tables) and return to the normal operation.
Error "01""02""03""04""05""06"

- *When errors in the table above occur,
- Error ("01""02""03""04""05""06") occurs.
- Cause of the error
- : Communication setting is wrong.
- : Noise in the communication cable.
- : Disconnect/connect RS232C cable or teaching box cable
- A01-1
- Via communication:
- Execute Command “RD” to clear the error.
- A01-2
- Via PLC:
- Execute PLC command “10h“ to clear the error.
- A01-3
- Via Teaching Box:
- Press CLR key to clear the error.
- Remove the cause of the error and return to the usual operation.
Error "*1"(step-out error)
- When Error "*1"(step-out error) occurs:
- Error "*1" occurs
- "*" shows the axis number. Remove the cause of the axis.
- (1: Arm 1 axis (right), 2: Rotation axis, 3: Arm 2 axis (left), 4: Z-axis, 5: X-axis)
- Cause of the error
- : Overload is applied to the axis.
- : Disconnection or connection problem of the cables between robot and the controller.
- : Improper setting of the servo data. (Only for SM/AM specs)
- : Emergency stop (stop by EMG/REM input)
- : Encoder pulse order contains noise.
- : Change of the step-out setting value. (not for all the robot type)
- : Controller driver problem
- : Motor problem
- A*1-1
- Via communication:
- Execute Command "RD" to clear the error.
- A*1-2
- Via PLC:
- Execute PLC command "10h" to clear the error.
- A*1-3
- Via Teaching Box:
- Press CLR key to clear the error.
- Remove the cause of the error and return to the usual operation. Make sure there is no interference within the operation range of robot beforehand.
- It is not necessary to execute "origin search".
- A*1-4
- When the error occurs again:
- Check if the robot (axis) is excited by moving the robot softly by hand.
- When moved (not excited), check the motor cable. Connect the cable properly and lock it.
- A*1-5
- Check if there is no interference with the robot. Check the operating environment.
- When interfered, remove the interference object using teaching box, and recover.
- A*1-6
- Check if the robot can be moved manually when the main power is turned OFF. (Z-axis has a brake and never moves. Also in some models, X-axis (track -axis) has a brake and never moves.)
- When the robot cannot be operated manually:
- Check if there is no object interfering with axes.
- Check if the robot is within the operation range.
- Check if the main power is turned OFF. Check the breaker.
- Check if there is no interference.
- A*1-7
- Check if JOG movement is available using the teaching box.
- If not, check if external stop order is not input from REM or I/O.
- A*1-8
- Check the power supply voltage.
- Check if driver setting (volume, switch), speed setting, or step-out detection has not been changed.
Error "*2" (limit stop)
- When Error "*2" (limit stop) occurs:
- Error "*2" occurs
- "*" shows the axis number. Remove the cause of the axis.
- (1: Arm 1 axis (right), 2: Rotation axis, 3: Arm 2 axis (left), 4: Z-axis, 5: X-axis)
- Cause of the error
- : Each axis reached the movement limit during operation.
- : Disconnection or connection problem of the cables between robot and the controller.
- : Disconnection of the limit sensor cable, or sensor failure.
- : Improper setting or setting change of the software limit. (Only for absolute type)
- : Current position is out of the operation range.
- : Change or resetting of the original position. (Only for absolute type)
- A*2-1
- Via communication:
- Execute Command “RD” to clear the error.
- A*2-2
- Via PLC:
- Execute PLC command “10h“ to clear the error.
- A*2-3
- Via Teaching Box:
- Press CLR key to clear the error.
- Remove the cause of the error and return to the usual operation. It is not necessary to execute "origin search".
- A*2-4
- When the error occurs again:
- Check the connector. Check if there is no disconnection of the cable.
- If the cable is loosened or disconnected, turn the power OFF and plug the connector properly. In the case of disconnection, replace the cables.
- A*2-5
- Check if the current position is within the operation range.
- When the current position is out of the range:
- Execute the origin search with ORG button of the teaching box.
- After turning the power OFF, move the robot back around the ORG position manually and restart the operation.
- For absolute type: check if the setting of the software limit or origin has not been changed.
- A*2-6
- Can the errors be cleared?
- If not, after turning the power OFF, move the robot back around the ORG position manually and restart the operation.
- For absolute type: check if the setting of the software limit or origin is not changed.
- A*2-7
- When the error occurs after operating the robot, check the robot serial number and contact JEL service section.
Error "*3" (adjust error)
- When Error "*3" (adjust error) occurs:
- Error "*3" (adjust error) occurs
- "*" shows the axis number. Remove the cause of the axis.
- (1: Arm 1 axis (right), 2: Rotation axis, 3: Arm 2 axis (left), 4: Z-axis, 5: X-axis)
- Cause of the error
- : Output error or setting error of the driver.
- : Setting of ADJUST is wrong.
- : External stress to the robot.
- A*3-1
- Via communication:
- Execute Command “RD” to clear the error.
- A*3-2
- Via PLC:
- Execute PLC command “10h“ to clear the error.
- A*3-3
- Via Teaching Box:
- Press CLR key to clear the error.
- Remove the cause of the error and return to the usual operation. It is not necessary to execute "origin search".
- A*3-4
- When the error occurs again:
- Check the driver setting.
- When setting is wrong or changed, return the setting to the original one and check again.
- A*3-5
- Check if there is no interference with the robot.
- When interfered, remove the interference object using teaching box, and recover.
- A*3-6
- Check the ADJUST setting.
- When the error cannot be cleared, after turning the power OFF, move the robot back around the ORG position manually and restart the operation.
- For absolute type: check if the setting of the software limit or origin is not changed.
- A*3-7
- When the error occurs after operating the robot, check the robot serial number and contact JEL service section.
Error "*4" (displacement during stop)
- When Error "*4" (displacement during stop) occurs,
- Error *4 occurs.
- "*" shows the axis number. Remove the cause of the axis.
- (1: Arm 1 axis (right), 2: Rotation axis, 3: Arm 2 axis (left), 4: Z-axis, 5: X-axis)
- Cause of the error
- : Each axis reached the movement limit during operation.
- : Disconnection or connection problem of the cables between robot and the controller.
- : Emergency stop
- : Encoder pulse order contains noise.
- : Change of the displacement setting value. (not for all the robot type)
- : Improper setting of the servo data.
- A*4-1
- Via communication:
- Execute Command “RD” to clear the error.
- A*4-2
- Via PLC:
- Execute PLC command “10H“ to clear the error.
- A*4-3
- Via Teaching Box:
- Press CLR key to clear the error.
- Remove the cause of the error and return to the usual operation. It is not necessary to execute "origin search".
- A*4-4
- When the error occurs again:
- Check if the robot (axis) is excited by moving the robot softly by hand.
- When moved (not excited), check the motor cable. Connect the cable properly and lock it.
- A*4-5
- Check if there is no interference with the robot.
- When interfered, remove the interference object using teaching box, and recover.
- A*4-6
- Check if the robot can be moved manually when the main power is turned OFF. (Z-axis has a brake and never moves. Also in some models, X-axis (track -axis) has a brake and never moves.)
- When the robot cannot be operated manually:
- Check if there is no object interfering with axes.
- Check if the robot is within the operation range.
- Check if the main power is turned OFF. Check the breaker.
- Check if there is no interference.
- A*4-7
- Check if JOG movement is available using the teaching box.
- If not, check if external stop order is not input from REM or I/O.
- A*4-8
- Check if speed setting has not been changed.
- Check if driver setting (volume, switch) has not been changed.
- Check if servo data has not been changed.
- Check if displacement detection has not been changed.
Error "07"(Alarm input stop)
- When Error "07"(Alarm input stop) occurs:
- Error "07" occurs
- Cause of the error
- : Emergency stop signal is input from teaching box.
- : Teaching box is disconnected or has connection problem.
- : Emergency stop signal is input via PLC.
- : REM terminal is opened.
- After clear the input signal:
- A07-1
- Via communication:
- Execute Command "RD" to clear the error.
- A07-2
- Via PLC:
- Execute PLC command "10h" to clear the error.
- A07-3
- Via Teaching Box:
- Press CLR key to clear the error.
- Remove the cause of the error and return to the usual operation. It is not necessary to execute "origin search".
Error "08"(Command error)
- When Error "08"(Command error) occurs:
- Error "08" occurs
- Cause of the error
- : Command format is wrong.
- : Command usage is wrong.
- : Command is input during operation.
- A08-1
- Via communication:
- Execute Command "RD" to clear the error.
- A08-2
- Via PLC:
- Execute PLC command "10h" to clear the error.
- A08-3
- Via Teaching Box:
- Press CLR key to clear the error.
- Remove the cause of the error and return to the usual operation. It is not necessary to execute "origin search".
Error "75"(Interlock error)
- When Error "75"(Interlock error) occurs:
- Error "75" occurs
- Cause of the error
- : Robot moves while the interlock input is OFF.
- After turning the interlock input ON:
- A75-1
- Via communication:
- Execute Command "RD" to clear the error.
- A75-2
- Via PLC:
- Execute PLC command "10h" to clear the error.
- A75-3
- Via Teaching Box:
- Press CLR key to clear the error.
- Remove the cause of the error and return to the usual operation. It is not necessary to execute "origin search".
Error "77"(Servo alarm)
- When Error "77"(Interlock error) occurs:
- Error "77" occurs
- Cause of the error
- : Overload is applied to each axis.
- : Disconnection or connection problem of the cables between robot and the controller.
- : Servo alarm is input.
- : Voltage shortage
- A77-1
- Via communication:
- Execute Command "RD" to clear the error.
- A77-2
- Via PLC:
- Execute PLC command "10h" to clear the error.
- A77-3
- Via Teaching Box:
- Press CLR key to clear the error.
- Remove the cause of the error and return to the usual operation. It is not necessary to execute "origin search".
- *Note: Error 77 cannot be cleared depending on the robot specifications.
- In this case, turn the power OFF and recover.
- A77-4
- When the error occurs again:
- Check the driver alarm on the display.
- When alarm is displayed:
- Check each axis and turn the main power OFF. Wait 15 sec and check again. If the error occurs again, check the robot serial number and contact JEL service section.
- A77-5
- Clear the error and check if JOG operation is available using teaching box.
- If JOG operation is not available, check the operation parameter. Check the original position.
- A77-6
- Operate the robot again, and check the driver status when the error 77 is occurred.
[an error occurred while processing this directive]